SerialTool Advanced Basic Features

SerialTool Advanced Basic Functions

On this page, I describe the advanced basic functions of SerialTool. These are a comprehensive list of features that become essential when developing software or firmware that uses the serial port. These functions are crucial for efficiently accomplishing your tasks, especially when you need to automate repetitive and time-consuming operations.

As described in the previous pages, the goal is to identify software that facilitates work when it comes to repeating long and repetitive operations. SerialTool stands out in this regard, providing a robust set of tools that make serial port management and debugging much more streamlined. After spending 8-10 hours in front of a screen, even simple tasks like copy-pasting can become prone to errors. SerialTool helps mitigate these issues by offering advanced functionalities that go beyond basic operations.

In this section, we delve into the advanced functions of SerialTool, which are designed to enhance productivity and reduce the complexity of serial port tasks. These advanced features are not just about sending a byte in hexadecimal or ASCII through the serial port; they encompass a wide range of capabilities that cater to the needs of developers and hobbyists alike.

Why SerialTool Stands Out

SerialTool is designed to be a comprehensive solution for managing and debugging serial communications. Unlike many other serial port software options, SerialTool provides a wide array of advanced features that make it a valuable tool for both professional developers and hobbyists. Whether you are working on embedded systems, industrial automation, or simple DIY projects, SerialTool offers the functionalities needed to streamline your workflow and enhance productivity.

In summary, SerialTool is not just about basic serial communication; it is about providing a powerful set of tools that cater to the diverse needs of serial port applications. From pre-stored buffers to network redirection and advanced debugging, SerialTool stands out as a versatile and reliable choice for anyone working with serial ports.

Let's now dive into the detailed analysis and description of what SerialTool offers, and how these features can significantly aid us as developers or hobbyists in our respective fields.
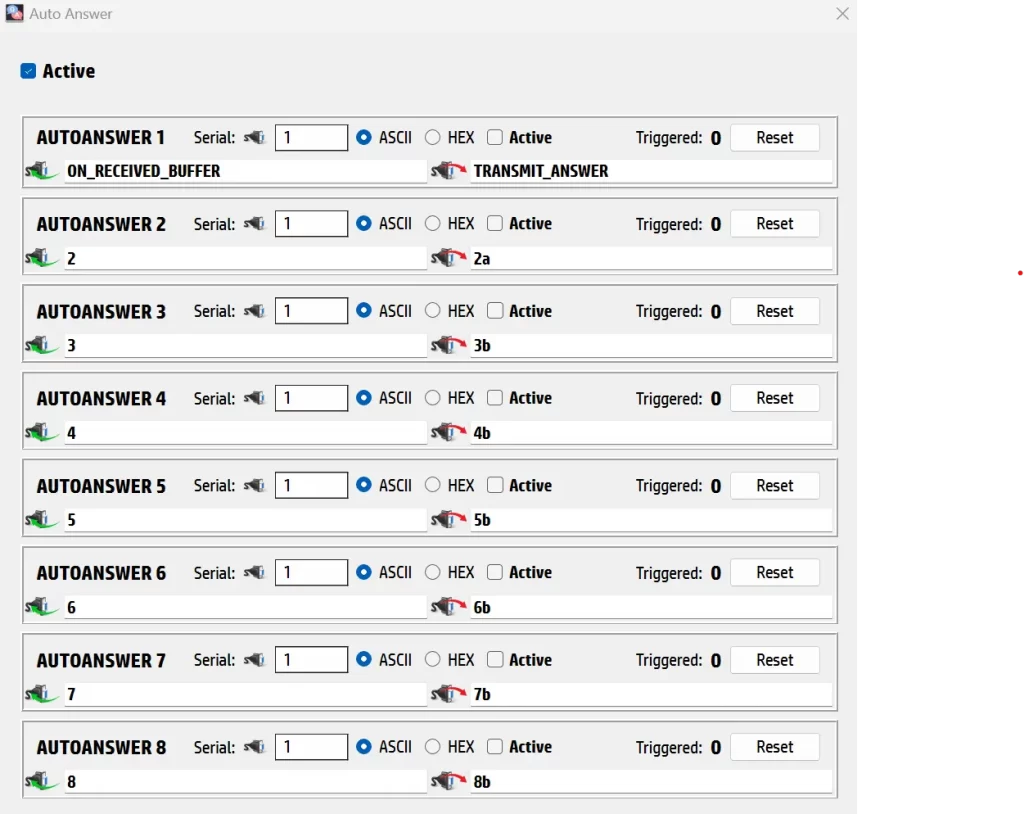
Auto Answer

Serial Port Auto Answer


In the first edit box of AUTOANSWER1, we put our ASCII string that we are waiting for, such as:

ON_RECEIVED_BUFFER

This string represents the specific data pattern or command that we are looking to detect in the incoming data stream.

In the second edit box, we put the response we want to send when the specified ASCII string is detected. For example, we might enter:

TRANSMIT_ANSWER

This is the exact data that SerialTool will send back as a response to the detected string. Next, we activate the “Active” flag to enable this auto-response functionality.

As a target, we specify serial 1. This means that SerialTool will monitor the data traffic on serial port 1 for the specified ASCII string.

The result will be that when serial 1 receives an ASCII buffer containing the string ON_RECEIVED_BUFFER, SerialTool will automatically send the response TRANSMIT_ANSWER through the same serial port. This automation can significantly simplify tasks like acknowledging commands or triggering specific actions without manual intervention.

Additionally, the target buffer can also be a hexadecimal buffer, and the response must be in hexadecimal. This allows for flexibility in handling different data formats, making SerialTool suitable for a variety of communication protocols and devices.

A useful label marked “Triggered” indicates how many times we have received and responded to our target string during the activity. This counter helps in monitoring and verifying that the auto-response mechanism is working correctly and can be invaluable for debugging and performance tracking.

This auto-answer function is extremely useful when developing applications, for example with Arduino, where we communicate with the UART port and need to simulate the response that the device connected to our Arduino might generate; in this case, our software SerialTool. The ability to concatenate up to 8 responses in auto-answer mode facilitates extensive and sequential testing in more complex applications.

One reason I particularly like SerialTool is that it speeds up my operations and does not require me to be constantly present or to click a button with the mouse at the right moment. As indicated by the developers, this function might slow down the analysis of incoming traffic. I deduce this is due to the need to analyze the packets. In any case, I have not encountered any particular problems for my applications.


Multiple Buffers Storing

Serilal Port Multiple Buffer Sending


The provided image shows the “Multi Buffer” feature of SerialTool, which allows users to store multiple buffers for sending to the serial port. Here’s a detailed explanation of how this feature works.

The Multi Buffer interface in SerialTool lets you define and manage multiple data buffers that can be quickly sent to the serial port. This is particularly useful for testing and debugging serial communication, as it allows you to pre-configure different sets of data and send them as needed without manually entering the data each time.

Buffer Configuration:

ASCII/HEX Selection: Each buffer can be configured to send data in either ASCII or HEX format.
Send CRLF: Option to automatically append a Carriage Return (CR) and Line Feed (LF) to the end of the data.
CRC Calculation: Configure the buffer to include a Cyclic Redundancy Check (CRC) value. You can select the type of CRC and whether it should be inverted.

Serial Port Selection
For each buffer, you can select which serial port (Serial 1, in this case) the data should be sent to. This allows you to manage communication with multiple devices if needed.

Buffer Data
Data Input: You can enter the data to be sent in either ASCII or HEX format, depending on the selected mode.
Send Button: Each buffer has a “SEND” button that, when clicked, will transmit the configured data through the selected serial port.

Load and Save Buffers
Load Buffers: This allows you to load previously saved buffer configurations, making it easy to reuse common data sets.
Set as Default: Save the current buffer settings as the default configuration.
Save Buffers: Save the current buffer settings for future use. This is useful for maintaining consistency in testing and debugging across sessions.

Practical Use Cases

When developing firmware or software that communicates over a serial port, you often need to send specific commands or data patterns repeatedly. The Multi Buffer feature allows you to automate this process by pre-configuring the required data.
If you are testing how your system handles incoming data, you can configure buffers to simulate responses from a connected device. By sending predefined buffers, you can systematically test different parts of your communication protocol to identify and debug issues.

The Multi Buffer feature in SerialTool significantly enhances the efficiency and flexibility of serial communication testing and debugging. By allowing the storage and quick sending of multiple buffers, it reduces the need for repetitive manual data entry and helps ensure consistency in testing scenarios.

This is a heading.

SerialTool Serial Alarms Triggering

The Serial Port Alarms function of SerialTool is a powerful feature designed to monitor incoming serial data for specific conditions and trigger predefined actions when those conditions are met. This functionality is particularly useful for real-time monitoring and debugging of serial communication, enabling automated responses to specific data patterns. Here's a detailed comment on the Serial Port Alarms function.

The Alarms function in SerialTool allows you to define multiple alarms that monitor serial data and trigger actions based on the content of the data packets. This feature can significantly enhance your ability to detect and respond to specific events in your serial communication workflow. You can configure and manage multiple alarms simultaneously. The interface allows for setting up to four alarms, each with its own specific conditions and actions.

Condition-Based Triggers:

Contains: An alarm can be triggered if a packet contains a specific byte sequence. This is useful for detecting particular commands or data patterns.
Does not contain: An alarm can be set to trigger if a packet does not contain a specific byte sequence, useful for ensuring critical data is present.
Starts with: Alarms can be triggered if a packet starts with a specific byte sequence, which is helpful for identifying packet headers.
Does not start with: Similarly, an alarm can trigger if a packet does not start with a specific byte sequence, ensuring proper packet formatting.

Data format for Alarms can be configured to monitor data in either ASCII or HEX format, providing flexibility to handle different types of serial data.

Actions on Trigger can be to Keep Logging and continue logging data when the alarm condition is met or Pop-Up Message to clock the application. Stop Scope to stop logging data and pause the analysis, allowing you to focus on the event that triggered the alarm.
Each alarm can be individually activated or deactivated, giving you control over which alarms are currently monitoring the serial data. Each alarm has a counter that tracks the number of times it has been triggered. This counter can be reset manually, which is useful for monitoring and analysis over specific periods. Alarms can be logged to a file for later analysis. You can save the alarm configurations and logs to a file, making it easy to review the data and events that occurred during your monitoring session.

Some practical use cases:

Real-Time Monitoring: Automatically detect  to specific data patterns in real-time, which is crucial for applications like remote device management, data logging, and automated testing.
Debugging and Diagnostics: Quickly identify when expected data is missing or when unexpected data patterns occur, helping you diagnose issues in your serial communication setup.
Automation: Set up automated responses to specific serial events, reducing the need for manual intervention and improving the efficiency of your workflow.

The Serial Port Alarms function in SerialTool is a robust tool for enhancing your ability to monitor, debug, and automate serial communication tasks. Its flexibility in defining conditions and actions, along with the ability to handle multiple alarms, makes it an invaluable feature for both developers and hobbyists working with serial data.

File sending via Serial Port

SerialTool Serial Port file Transfer


Alright, let's get into the awesome feature of SerialTool that lets you send files in chunks through the serial port. This is perfect for those times when you need to transfer data efficiently without overwhelming your device or the connection.

Sending Files in Chunks with SerialTool

Imagine you're working on a project where you need to transfer a large file to your device over a serial connection. Maybe you're updating firmware, sending a big batch of data for processing, or just moving files around in a setup that doesn’t support traditional network transfers. SerialTool has got you covered with its nifty file transfer feature.

Here's how it works:

The Setup

  1. Load Your File:

    • At the top, there’s a “File To Transfer” field where you can load the file you want to send. Simply click the “Load File” button, and select your file from your computer. This is super easy and straightforward.
  2. Transfer Parameters:

    • Bytes per Block: This setting lets you define the size of each packet. For example, if you set it to 32 bytes, SerialTool will break your file into chunks of 32 bytes each. This helps in managing the flow of data, especially over slower connections.
    • Delay Between Blocks: Here, you can specify a delay in milliseconds between each block of data sent. This is crucial if your device needs a little breathing room to process incoming data. You might set this to 50 milliseconds to ensure there’s no data overrun.
    • Serial to Send File: Choose the serial port through which you want to send the file. This is handy if you have multiple serial devices connected.
  3. Pause Data Flow:

    • There’s an option to pause the regular data flow during the file transfer. This can prevent any data collision or corruption, ensuring your file gets through without a hitch.

File Transfer Progress

At the bottom, there's a progress bar showing the percentage of the file that has been transferred and the total number of bytes sent. This real-time feedback is great because it lets you know exactly how far along the transfer is and if any issues arise.

Why Transfer Files via Serial?

You might wonder, why bother transferring files over a serial connection? Here are a few scenarios where this becomes super useful:

  • Firmware Updates: When updating the firmware of microcontrollers or other embedded devices, you often need to send the update file over a serial connection.
  • Data Logging: If you have a device that logs data and needs to send it back to a central system, doing this in manageable chunks helps ensure no data is lost.
  • Remote Commands: Sometimes, you need to send configuration files or command sets to a device in the field. Serial transfers are reliable and straightforward in these cases.

The Benefit of Chunks

Sending a file in smaller packets (or chunks) with delays can significantly improve the reliability of the transfer. Devices often can’t handle large bursts of data all at once, especially if they have limited processing power or memory. By chunking the file, you ensure that each piece of data is received, processed, and acknowledged before the next piece is sent. This method reduces the chance of errors and makes the transfer process much smoother.

Wrap-Up

SerialTool’s file transfer feature is a real game-changer for anyone who needs to move files over a serial connection. Its user-friendly interface, combined with flexible transfer parameters, makes it easy to ensure your data gets where it needs to go safely and efficiently. Whether you’re a developer, an engineer, or just tinkering with your gadgets, this feature can save you a ton of time and headaches.

So next time you need to send a file over a serial port, remember that SerialTool has your back, making the process as seamless and reliable as possible. Happy transferring!

Serial Port Packet to the Network

SerialTool Packet To Network TCP


The Serial Packet Send to Network function in SerialTool is a versatile and powerful feature that allows you to seamlessly bridge serial communication with network protocols, enabling the forwarding of serial data to networked systems or applications. This function has proven to be incredibly useful in my own projects, especially when I needed to monitor and control remote devices without being physically present.

The user interface for this feature is clean and intuitive, providing straightforward configuration options where you can easily specify the server address and port to which the data will be sent. Selecting the desired protocol, whether it be TCP, UDP, HTTP/HTTPS GET, or HTTP/HTTPS POST, is a breeze, each catering to different network communication needs. For instance, I often use the TCP protocol for stable and reliable data transmission when integrating with server applications, while opting for HTTP POST when I need to send data to web services or APIs.

One of the standout aspects of this feature is the ability to send both incoming and outgoing serial port data. This comprehensive data capture and transmission capability ensures that no crucial information is missed, making it ideal for real-time monitoring and control systems. In one of my projects involving remote environmental sensors, this function allowed me to efficiently forward data to a central monitoring system over the internet, significantly simplifying the data aggregation process.

Additionally, the connection test feature built into the interface has been a lifesaver. Before deploying the system, I could verify the network configuration right from SerialTool, ensuring that the serial data would be correctly routed to the intended network destination. This immediate feedback not only saved me time but also helped troubleshoot any connectivity issues early in the setup process.

The integration of serial and network communication within SerialTool enhances its utility for developers and engineers working with embedded systems. It simplifies the task of extending serial device data to broader network-based applications, facilitating more complex and scalable communication setups without the need for additional hardware or intermediary software. In my experience, this feature has been invaluable for creating robust and flexible systems that bridge the gap between traditional serial communication and modern network infrastructures, making SerialTool a critical component of my development toolkit. Whether I am working on industrial automation, remote monitoring, or IoT applications, this function ensures that serial data can be effectively and efficiently integrated into network-based solutions, streamlining workflows and expanding the possibilities for innovative projects.

Timed serial packet sending with header and footer

SerialTool Serial Port Send Timed


As a developer who has extensively used Serial Port software in general, I can confidently say that the “Special Buffers” function has revolutionized the way I handle serial communication, especially when working with embedded systems. This feature is incredibly powerful for sending timed multiple packets and has significantly streamlined my workflow.

The Multiple Send functionality allows me to send a specific message through the serial port at regular intervals. For instance, I often need to send a series of commands or data to an embedded device to test its response under continuous input conditions. By inputting my message, like “Hello World,” in ASCII format, I can easily configure it to be sent multiple times. One of the most valuable aspects of this function is the ability to append a Carriage Return (CR) and Line Feed (LF) to each message, ensuring that the receiving device interprets the end of each packet correctly. Additionally, I can include a CRC (Cyclic Redundancy Check) to maintain data integrity, with support for various CRC types such as CRC_16_MODBUS.

What makes this feature particularly useful is the timing control. I can set how many times the message should be sent and the interval between each send in milliseconds. This capability is incredibly useful when I need to create a consistent data stream for testing purposes. For example, I might configure it to send the message five times with a one-second interval between each transmission. This setup allows me to observe how the embedded system handles repeated data inputs over time, helping me identify any issues with data processing or buffer management.

Another aspect of the Special Buffers function that has greatly aided my development and debugging process is the ability to add counters before or after the packet payload. This feature is a game-changer when working with complex embedded systems because it allows me to track and validate the sequence of packets being sent. By inserting a counter at the beginning of the buffer, I can see an incrementing number with each packet, providing a clear indication of the sequence of transmissions. This is incredibly helpful for ensuring that all packets are received in the correct order and none are missed.

Alternatively, placing the counter at the end of the buffer is equally useful. It allows me to verify the complete payload integrity and order, making debugging more straightforward. For instance, when developing firmware for a microcontroller, I often simulate a series of incoming messages to test how the firmware processes continuous data streams. The counter helps ensure that no packets are missed or out of order, making it easier to pinpoint where any issues may arise.

Overall, the Special Buffers function in SerialTool has become an indispensable part of my development toolkit. It has provided me with the flexibility and control needed to handle a variety of serial communication tasks efficiently and effectively, from sending timed packets to embedding counters for tracking purposes. This feature has not only saved me time but also improved the accuracy and reliability of my testing and debugging processes.

CRC Auto Complete

SerialTool CRC

SerialTool can autocomplete a packet with a CRC when sending it via the serial port. CRC, or Cyclic Redundancy Check, is a method used to detect errors in data transmission. It involves appending a calculated checksum (the CRC) to the data. When the data is received, the receiver performs the same CRC calculation and checks if the result matches the received checksum, thus verifying the data integrity. You can learn more about CRC on Wikipedia.

SerialTool supports various CRC types, ensuring comprehensive error-checking capabilities. Here's the supported CRC list (please check on the official list the supported CRC or try directly from the software.

CRC-8:

  • CRC 8
  • CRC 8 EBU
  • CRC 8 HDLC
  • CRC 8 MAXIM
  • CRC 8 WCDMA
  • CRC 8 LTE

CRC-16:

  • CRC 16 ARC
  • CRC 16 BUYPASS
  • CRC 16 CCITTFALSE
  • CRC 16 MCRF4XX
  • CRC 16 CDMA2000
  • CRC 16 CMS
  • CRC 16 DECTR
  • CRC 16 DECTX
  • CRC 16 DNP
  • CRC 16 GENIBUS
  • CRC 16 KERMIT
  • CRC 16 MAXIM
  • CRC 16 MODBUS
  • CRC 16 T10DIF
  • CRC 16 USB
  • CRC 16 X25
  • CRC 16 XMODEM

CRC-24:

  • CRC 24
  • CRC 24 FLEXRAYA
  • CRC 24 FLEXRAYB
  • CRC 24 LTEA
  • CRC 24 LTEB
  • CRC 24 NRC

CRC-32:

  • CRC 32
  • CRC 32 BZIP2
  • CRC 32 C
  • CRC 32 MPEG2
  • CRC 32 POSIX
  • CRC 32 Q

This extensive support allows for versatile and reliable communication over the serial port using SerialTool.